Also, I will try my best to explain clearly each of the steps, but you may find this tutorial a little hard to follow if you are new to these softwares. If you get lost or things don't work the way it should, I sugest you to look for more specific tutorials on the function you have problems with.
Finally, not all pictures need the same amount of retouching! It will depend if your camera was well set when you took the picture, if you had enough light and many other details. But once a picture is taken, it is too late to change it, so the only option left is to fix it on the computer. Also, all the tips are
optionals, this means that you can skip any of the following steps if you find that your picture doesn't need such corrections.
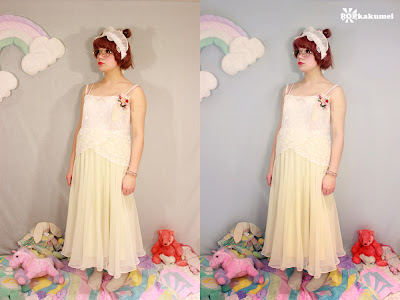
Picture with little retouching :  Picture with more heavy retouching :
***
So let's get started~~!
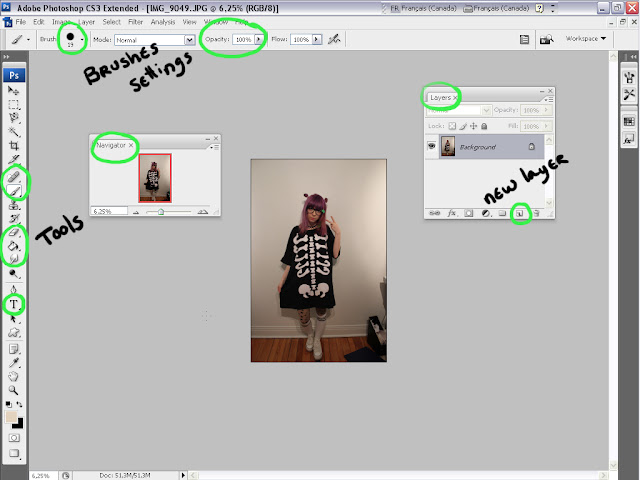
First, open the picture you are going to work on!
I chose a random coord I wore yesterday, and I voluntarily misadjusted my camera to use it for this tutorial~

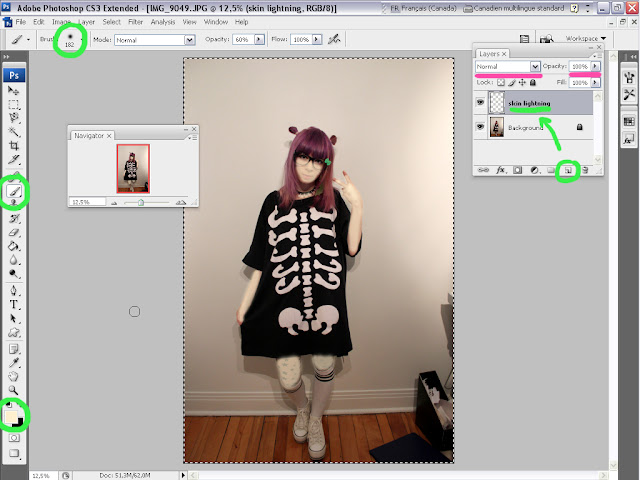
(I circled in green the tools and the settings we are going to use. Make sure your layer box is open, because you will need it!)
★Tip 1 : Levels
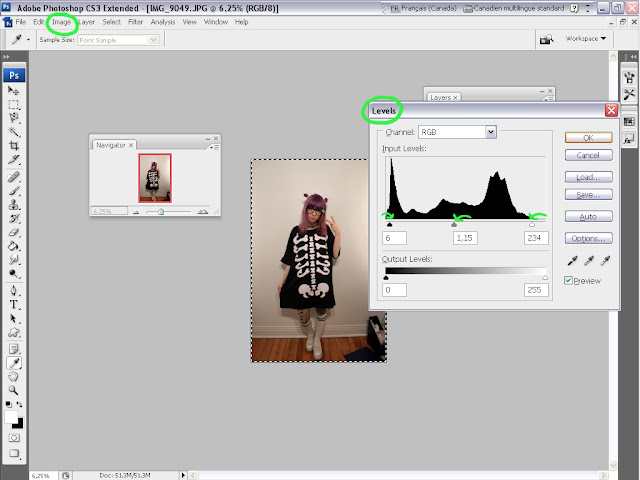
My first step is always adjusting the levels. This will help you correct the overall lighting of the picture.
Open the layer window (''Image/Adjustment/Levels'' or ''ctrl l'' in Photoshop, or ''Colors/Levels'' in Gimp). A box with a gradient line and three arrows will appear.

The middle arrow adjusts the middle tones and the two others the amount of white and black.
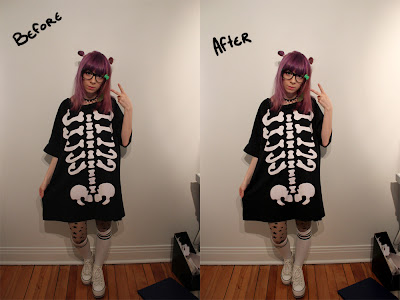
I always drag the middle arrow to the left to lighten the skin tones and drag the black and white arrow towards the middle to increase the contrast. While doing this, make sure the black parts of your picture are really black and the white parts are light enough.

My result after this first step! Already a little better, no?♪
★Tip 2 : Smoothing
When your picture is small or has a low resolution, smoothing your skin may not be necessary. However, I really recommend it for face closeups or high resolution pictures!
There are several tools that can be used for smoothing. To erase acne or other marks the ''healing tool'' is the best. It will replace small stains with the average color that is around. Then, you can use the ''blur tool'' to make your skin look more smooth. However, be careful not to use it over other details of your face such as your mouth or your eyes, or it will blur the edges. I also use the smudge tool to correct some wrongly placed shadows and to smooth my hair a little, following its shape (see the green arrows). This tool will ''drag'' the color with your brush, so be careful wich way you move it. It is a lot easier to use it with a graphic pad.
Finally, no matter wich tool, always use it with a soft brush with about 50% of opacity. You don't want to see any brush stroke in your final picture!
★Tip 3 : Skin
As I prefer lighter skin, I always retouch pictures in order to make the skin appears lighter. However, if you prefer darker skin, you can use the same steps but with a darker color, or you can just leave your skin as it is. Making your skin lighter will help to erase little wrinkles and shadows that make your face look weird.

Create a new layer.
With a soft brush and a light color (I use a light yellow or pure white) go over your skin, leaving out the eyes and the strong shadow areas (like your neck). When you are done, set this layer to ''soft light'' (you can also try ''overlay'' ) and lower the opacity until you are satisfied (depending on the picture, I set this layer between 10% and 30%). If you want your mouth to stand out more, you can set the eraser to a soft little brush with low opacity and gently erase around your lips.
★Tip 4 : Eyes, face and mouth
Next step is correcting your makeup!
With the paintbrush tool, take a small soft brush with 30% of opacity and gently put some black over your eyeliner and outer eye corner, and some white in the inner corner of your eyes. I also put some soft pink on my lips and cheeks.
If your makeup is different than mine, or if you have eyeshadow, paint it over with the right color! The point here is to enhance your makeup and to make your eyes look bigger.
When you're done (if like me you look like a clown it is perfectly normal), set this layer to ''soft light'' mode and lower its opacity as you like!
Still alive? We are already halfway through!
Here is what I got after retouching the face~
 ★Tip 5
 : Lighting correction
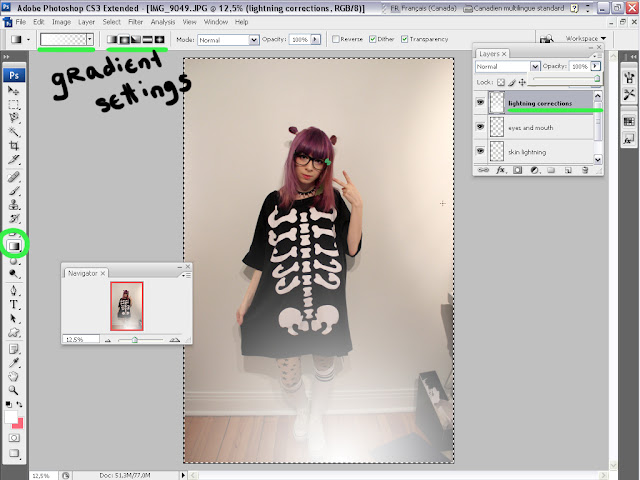
In the first step of this tutorial, we adjusted the levels. However, a picture is not always equally bright, especially when the light was bad. Take a look at your picture and ask yourself if some parts are too bright or too dark. In my case, I found that the lower half was a little too dark compared to the top.

Create a new layer. With a large soft brush or with the gradient tool, go correct the problematic area. Use white to lighten it or black to darken it. You can create as many layers as the number of areas you want to correct, or all do it on the same layer. Then again lower the layer's opacity and set it to ''soft light''.
★Tip 6 : Color corrections
Depending on the lighting or the camera you have, the colours may not come out as you wish. Now it is time to correct it! You can use this step to give more intensity to colours you like in your picture.
Again on a new layer, select the color you want to correct and apply it with the paint brush on the right area. In my case, I used purple on my hair and bright green on my earring and glasses. Then set this layer to ''color'' and lower its opacity.
★Tip 7 : Last adjustments
Make sure you are satisfied, then merge all your layers (''Layers/Flatten image'' in Photoshop or ''Image/Flatten image'' in Gimp).
Then, it is the time to make the last adjustments to your image. I will often play with the levels one more time to be satisfied. You can also adjust the ''hue-saturation'' and the ''brightness-contrast'' settings.
★Tip 8 : Decorations
This last step is optional. This is when you add text or brushes to decorate your picture! I like to add stars, hearts or little bats.
In this case, I also added some random shapes to hide the garbage in the corner of the picture~
Use the text tool to add text. For decorative shapes, use the paint brush tool and change the shape of the brush to something cuter like a heart or a little glitter. You can download brushes on various websites (such as deviantart) or make your own.
I am done! What do you think~~?☆
If you have questions or if you would like informations on other retouching-related things please let me know~~
✝ Nii

